I first wrote this on Afiq's birthday, which was on April 16th. Every time I try to write something so close to my heart, I find myself lost for words.
------------------------
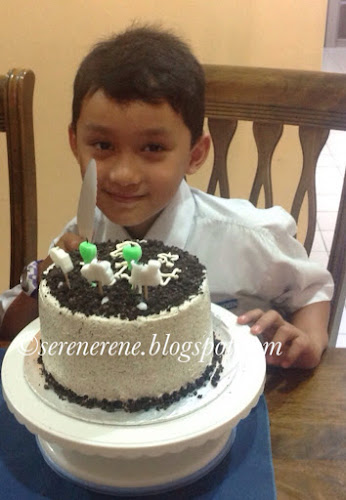
Afiq turns 8 today, Alhamdulillah. How time flies, it surely doesn't feel like it has been 8 years since I laid eyes on him.
I look at him now and I am amazed at how precise he is to my imagination of how I would dream my first born to be and more. I look at him and I know I'm blessed. I look at him and I feel overwhelmed with emotions. Love, pride and now that he's 8, I am more worried about my ability to be the mother he needs; to guide him to be successful not only in this world but more importantly in the hereafter.
May Allah guides us to be the best we can be.
Happy birthday, Afiq. Doa Mama Afiq selalu dalam lindungan Allah, membesar menjadi insan soleh yang cerdik pandai, beramal soleh.
For his birthday, I wanted to bake something he loves. Well, he is my number 1 fan when it comes to my baking. Breads, muffins, cakes - most of the time he would be the most excited one. So I wanted this cake to be extra special.
He loves Oreo. Really, really loves Oreo. So I searched for Oreo Cake Recipes. Most results I found were Oreo Cheesecake, though. I finally stumbled upon this recipe and thought it looks simple enough.
OREO CUP CAKE
From Ita Masam Manis
250 gm butter
1 cwn gula
2 cwn tepung naik sendiri - I used tepung kek
1 sudu kecil baking powder - tepung dan baking powder diayak
4 biji telur
1 sudu kecil esen vanilla
8-10 keping oreo - kisar halus
Campurkan butter, gula. tepung, baking powder, telur dan esen vanilla dan pukul selama 2 minit. Jangan terlebih pukul ye!
Campurkan oreo dan kacau rata.
Tuangkan adunan dalam paper cup. Susun atas tray
Bakar dalam oven dgn suhu 170C selama 10 - 15 minit atau sehingga masak.

* Note: Since I used this recipe to make a cake instead of cupcakes, the method I used is slightly different:
Pukul butter dan gula sehingga kembang. Masukkan telur satu persatu. Masukkan esen vanila. Masukkan tepung. Bakar dalam oven pada suhu 170C sehingga masak.

Note: the first time I made this cake I used 2 x 7 " pans. It took around 45 minutes since the cake was quite thick. This morning I used 2 x 9" pans instead and it took around 30 minutes.

For the buttercream, I used this recipe from here: buttercream
BUTTERCREAM
250 gm butter
250 gm krimwell
125 gm gula icing
200 gm golden syrup
Pukul butter dgn krimwell hingga putih. Ayak gula dan masukkan ke dalam butter dan pukul hingga licin. Gunakan speed perlahan.
Bila sudah licin masukkan golden syrup dan pukul dgn speed laju hingga adunan putih dan creamy.
Note: I also added a cup of crushed Oreo to the buttercream.


Alhamdulillah, the cake turned out very very good! It was so good that Shahril told me I should bake it again when we had a small makan-makan just 4 days after I baked the first one!

Alhamdulillah, once again it was a huge success. It was so good, my sister-in-law wanted to order it for her birthday in August! Alhamdulillah.I was so busy being a host, I didn't get to take lots of pictures.

I am really happy with this cake. I have baked quite a number of cakes, and I am not really a cake person, so my expectation of a cake is rather high. This is the first cake I feel confident enough to sell, so when a few friends asked whether they can order this from me, I gathered my guts and said yes.
So the very next day after we had our 2nd Oreo Cake, I baked this for a dear friend.


Alhamdulillah. I hope this will be a blessed new adventure for me.


The actual intent of this post is to test an app I just bought called Blogsy.

Muiz was obviously not as excited as I was at Yummie. He fell asleep 10 minutes after I stepped into the shop. :)

* Can't imagine what it would be like without my Snuggbaby.


We celebrated Shahril's birthday a few days earlier since we were at my MIL's. Shahril wanted a simple cake, so I made this Victoria sandwich cake.

The recipe is from:The Kitchen Guardian

250g butter, leave soft
250g caster sugar, I used 220g because I added golden syrup - me too
5 large eggs
1 tsp vanilla extract
1 tbsp golden syrup
2-3 tbsp milk
280g self-raising flour

Method
Preheat oven at 170C.

Cream butter and sugar and vanilla until light and fluffy. I used my wooden ladle! Add eggs in three additions. Lastly add srf in 3 additions, fold in milk until incorporated.

I used 3, 7 inches round cake tins...and I liked them! Bake for about 30 minutes until golden in colour.

Let cool and sandwich with Raspberry jem, and sprinkle sugar on top!

* I don't have raspberry jam, so I used strawberry jam instead.

The verdict: in my honest opinion, the cake is pretty ordinary. It's basically just a simple butter cake albeit a little dense which I think is from using the milk and golden syrup. But, here's the but: what makes it really special is the jam. The tangy and sweet strawberry jam brings the best out of this cake.

Everyone loves this cake. The kids, the elderly, everyone Alhamdulillah.


Labels: 1 comments | edit post
I've heard about donat kentang quite a while ago. A colleague raved about how good a donat kentang tastes. I remember looking for the recipe, but I was turned off by the fact that it requires 4 egg yolks to make!

I totally forgot about it after that, until recently when I was about to bake a cake for Mariessa's birthday celebration at school. The cake recipe calls for 5 egg whites and I wondered what I could use all the egg yolks for. Started googling and came across the donat kentang again. I was thrilled, like finally, I have a good reason to try it!

Of course, there are a lot of variations of donat kentang recipes on the net, but this one seems to be the most talked about. You can google for 'Donat Kentang Fatmah' and see just how many people have tried this recipe.

I got mine from This blog

Donut Kentang

Bahan-bahan
500 gram tepung berprotein tinggi/gandum - I used tepung gandum
50 gram susu tepung
11 gram yis kijang - I used instant yeast (mauripan)
200 gram kentang, kukus, haluskan dan dinginkan - instead of kukus, I just rebus 2 medium size potatoes. Lenyekkan and biarkan sejuk.
100 gram gula pasir
75 gram mentega/marjerin
½ sudu kecil garam
4 biji kuning telur - I had 5, so I just threw all 5 in. Why waste, kan? Hehe
100 ml air sejuk dari peti ais

Cara-caram
Dalam mangkuk besar, satukan tepung gandum, gula, susu tepung, yis dan digaul rata.

Masukkan kentang halus, kacau rata dahulu sebelum dituang telur dan air sejuk. Uli hingga rata dan setengah elastik.

Selepas itu, baru dimasukkan mentega dan garam, uli terus hingga menjadi elastik. Rehatkan selama 15 minit.

Bahagi doh kepada 50 gram dan dibulatkan licin. Rehatkan lagi selama 15 minit sehingga mengembang.

Buatkan lubang di tengah tengah dengan gerakan memutar dan segera digoreng dalam minyak sederhana panas sehingga berwarna kuning keperangan.

Angkat dan toskan. Tabur dengan gula kaster atau hias dengan coklat.

** What I did was, as always, I just put everything into the bread maker. I have to admit that I have some doubts I the beginning. The dough looked keras (in the beginning) and it looked as if the bread maker was struggling to knead. I contemplated adding more water but I decided to wait. Lucky I didn't, because after 15 minutes of rest after kneading, the dough was just perfect. In fact, when I was taking the dough out of the bread maker, I was really surprised at how soft and yet firm the dough was. Must have been the butter and the mashed potato. A nice dough to work with, really.

By the way, the bread maker takes one and a half hour to finish the whole process. The first half hour is for kneading and the hour after that is for the dough to rise. I let this dough to rise for only 15 minutes as I was pressed for time - I started the whole process at 5 a.m and I need to have the donuts ready before Afiq leaves for school at 6.45 a.m. Instead of shaping the donuts 'manually', I use the donut cutter.

This recipe yields a lot of donuts - 28 large ones in my case ( it depends how big and thick you make it). So I keep half of it frozen after frying it lightly. Oh and the most tricky part of the whole process for me is actually frying the donuts. I started with medium heat and even then the donuts turned brown in a split second.

After tasting this donut, I honestly think the 'regular' donut will seem very plain and boring. Hehe.


Labels: 0 comments | edit post
Now that I'm staying home, this is one of the luxuries I get to enjoy more;

Watching my child(ren) sleeping.


                         " There was never a child so lovely but his mother was glad to get him to sleep.
Ralph Waldo Emerson "

Labels: 0 comments | edit post

I do realize that all I blog about these days is about my 'culinary' adventures. I don't mean it to go that way, but the truth is, writing about the things I cook require the least words and time! I mean, I just copy the recipe and paste it here, put up a picture or two and wallah, it's one entry done!

I have so much to write about the kids, I will make sure I do, but for now let's just take about pretzels first, shall we?

Afiq lovessssss Auntie Anne's pretzels. I do too, but not as much as Afiq does. So one day, during my shopping trip at Yummie, I came across a bottle of caramel sauce, and I thought, hey, I can try making pretzels and eat them with the caramel sauce. I don't know why I thought making pretzels is easier than making the caramel sauce, but my brain is complicated that way.

So I bought that bottle of caramel sauce and finally attempted at making pretzels yesterday.

For me, beside searching for the recipe with the most positive reviews, watching a few videos on how to twist the pretzels is important too prior to making the pretzels. It will help a lot when you're making the pretzels, so I would recommend that you do that too.

-------------------------------
I used the recipe from CDK KITCHEN
Aunt Annie's Soft Pretzels
serves/makes: 12

ingredients:
For the pretzels
1 1/2 cup warm water
1 1/8 teaspoon active dry yeast
2 tablespoons brown sugar
1 1/8 teaspoon salt
1 cup bread flour
3 cups regular flour

For the soda bath:
2 cups warm water
2 tablespoons baking soda

For toppings:
to taste coarse salt
4 tablespoons butter (melted)

directions:

Note: as usual, I used my bread maker, so I just put all the ingredients for the dough into the breadmaker for it to do its magic.

I noticed that the dough was a little sticky, so while the bread maker was kneading I added a few spoonfuls more of flour.

The 'manual way':

Sprinkle yeast on lukewarm water in mixing bowl; stir to dissolve. Add sugar, salt and stir to dissolve; add flour and knead dough until smooth and elastic. Let rise at least 1/2 hour.

While dough is rising, prepare a baking soda water bath with 2 cups warm water and 2 Tbsp baking soda. Be certain to stir often. After dough has risen, pinch off bits of dough and roll into a long rope* (about 1/2 inch or less thick) and shape. Dip pretzel in soda solution and place on greased baking sheet. Allow pretzels to rise again. Bake in 450 degrees F oven for about 10 minutes or until golden. Brush with melted butter and enjoy!

Toppings: after you brush with butter try sprinkling with coarse salt. Or for Auntie Anne's famous Cinnamon Sugar, try melting a stick of butter in a shallow bowl (big enough to fit the entire pretzel) and in another shallow bowl make a mixture of cinnamon and sugar. Dip the pretzel into the butter, coating both sides generously. Then dip again into the cinnamon mixture. Enjoy!

* The longer and thinner you can make the dough rope, the more like Auntie Anne's they will be. (Of course I don't have the counter space!)

*Sweet butter, not regular butter, is one of her secrets!

---------------------------------

The pretzels turned out really good. As suggested in the recipe, the longer and thinner you can make the dough rope, the more like Auntie Anne's they will be. I find it quite tough to make it really thin, as it will be more fragile especially when dipping them into the soda bath, but I think it's just a matter of skills (or lack of in my case, hehe).

The most interesting part of my pretzels story is however this: remember that bottle of caramel sauce I bought? I open it as soon as my pretzels were ready... And oh my god, it tastes horrible! Extremely terrible! Macam ubat gegat! Not that I've tasted ubat gegat before, but it sure smelled the same.

I ended up making my own caramel sauce (after quickly googling it). The best thing is, it only took me 5 minutes to make it! Ironic, isn't it?

Here's the recipe for the caramel sauce adapted from here

caramel sauce dipping:
1/2 cup granulated sugar
1 tbsp water
1/4 cup heavy cream, room temperature - I didn't have heavy cream, so I used whipping cream instead.
1/4 tsp salt
1 tsp butter

- it was a little thick (maybe it was because I was using whipping cream instead of heavy cream, so I added a few spoons of water)

directions:
put sugar and water in a heavy based saucepan. heat until it becomes dark amber color.
add in salt, pour in heavy cream (it will bubble like mad), stir until smooth and even color. remove from heat. let cool for 5 minutes.
add in butter, stir evenly.


Labels: 0 comments | edit post